How to Install Nagios on CentOS 8
Traducciones al EspañolEstamos traduciendo nuestros guías y tutoriales al Español. Es posible que usted esté viendo una traducción generada automáticamente. Estamos trabajando con traductores profesionales para verificar las traducciones de nuestro sitio web. Este proyecto es un trabajo en curso.
Nagios offers a popular and powerful tool for server monitoring. With a built-in dashboard, alert and notification capabilities, and a range of plugins, Nagios can meet most needs.
Learn how to get started with Nagios on CentOS, AlmaLinux, and Rocky Linux in this tutorial. Follow along to install a Nagios instance and start navigating what it has to offer.
Before You Begin
If you have not already done so, create a Linode account and Compute Instance. See our Getting Started with Linode and Creating a Compute Instance guides.
Follow our Setting Up and Securing a Compute Instance guide to update your system. You may also wish to set the timezone, configure your hostname, create a limited user account, and harden SSH access.
sudo. If you’re not familiar with the sudo command, see the
Users and Groups guide.How to Install Nagios
While Nagios is generally available from most system’s package managers, the recommended installation is from source. Installations from package managers tend to have hidden configuration needs, and lack documentation and support.
This tutorial outlines the source installation process.
While the steps in this tutorial focus on CentOS Stream 8, they should also work on AlmaLinux and Rocky Linux.
Preparing the System
In addition to the steps in the Before You Begin section above, Nagios has a few more installation prerequisites.
First, set SELinux to permissive mode. This limits SELinux to issuing warnings rather than rules enforcement.
sudo sed -i 's/SELINUX=.*/SELINUX=permissive/g' /etc/selinux/configsudo setenforce 0Learn more about SELinux in our guides Getting Started with SELinux on CentOS 8 and Changing SELinux Modes.
Typically, CentOS and similar RHEL-based systems use Firewalld for managing firewall rules. Use the following commands to open the server’s HTTP and HTTPS ports and then reload Firewalld:
sudo firewall-cmd --zone=public --add-service=http --permanent
sudo firewall-cmd --zone=public --add-service=https --permanent
sudo firewall-cmd --reload
See more on using Firewalld in our guide Configure a Firewall with Firewalld.
Install the prerequisite packages for the Nagios installation:
sudo dnf install gcc glibc glibc-common make gettext automake autoconf gd gd-devel perl net-snmp net-snmp-utils openssl-devel epel-release wget tarsudo dnf --enablerepo=powertools,epel install perl-Net-SNMP
Setting Up the LAMP Stack
Nagios uses a LAMP stack for its base application and to serve its monitoring interface. Learn more about LAMP stacks, as well as how to set them up, in our guide Installing a LAMP Stack on CentOS 8.
However, Nagios only needs to install two parts of the LAMP stack: the Apache Web Server and PHP. The following steps just set up these necessary parts.
Install the Apache Web Server:
sudo dnf install httpdStart and enable the Apache Web Server:
sudo systemctl start httpd
sudo systemctl enable httpd
Install PHP:
sudo dnf install php php-cli
Downloading and Installing Nagios
Download and extract the Nagios Core and Nagios plugins packages. You could go to the Nagios Core releases page and the Nagios Plugins releases page to manually copy the link to the latest packages for each. However, the cURL commands below expedite this, automatically pulling the latest release of each.
cd /tmp
curl -s https://api.github.com/repos/NagiosEnterprises/nagioscore/releases/latest \
| grep "browser_download_url.*nagios.*.tar.gz\"" \
| tail -n 1 \
| cut -d : -f 2,3 \
| tr -d \" \
| wget -O nagios-core.tar.gz -qi -
curl -s https://api.github.com/repos/nagios-plugins/nagios-plugins/releases/latest \
| grep "browser_download_url.*nagios-plugins.*.tar.gz\"" \
| tail -n 1 \
| cut -d : -f 2,3 \
| tr -d \" \
| wget -O nagios-plugins.tar.gz -qi -
tar xzvf nagios-core.tar.gz
tar xzvf nagios-plugins.tar.gz
Change into the Nagios Core directory. You may have to adjust this command depending on the directory the Nagios Core package extracted in the step above.
cd nagios-4.*/Compile the Nagios source files:
sudo ./configure
sudo make all
Run the script to create the Nagios user and user group and add the
apachegroup to thenagiosuser:sudo make install-groups-users sudo usermod -aG nagios apacheInstall Nagios from the compiled files:
sudo make installInstall the Nagios service, command mode, and default configurations. The last command restarts the Apache service for its configuration changes to take effect.
sudo make install-daemoninit
sudo make install-commandmode
sudo make install-config
sudo make install-webconf
sudo systemctl restart httpd
Add the
nagiosadminuser account viahtpasswd. Running this command prompts you to create a password for the new user account. This is the user you use to log into the Nagios interface.sudo htpasswd -c /usr/local/nagios/etc/htpasswd.users nagiosadminStart up and enable the Nagios service:
sudo systemctl start nagios
sudo systemctl enable nagios
Change into the directory for the Nagios plugins:
cd /tmp/nagios-plugins-*/Compile and install the Nagios plugins:
sudo ./configure
sudo make
sudo make install
How to Start Using Nagios
With the new Nagios instance installed and running, access the Nagios interface from a web browser. Navigate to the path /nagios on your system’s public IP address or configured domain.
For example, if your public IP is 192.0.2.0, then you would navigate to http://192.0.2.0/nagios. Alternatively, if your domain name is example.com, you would navigate to example.com/nagios.
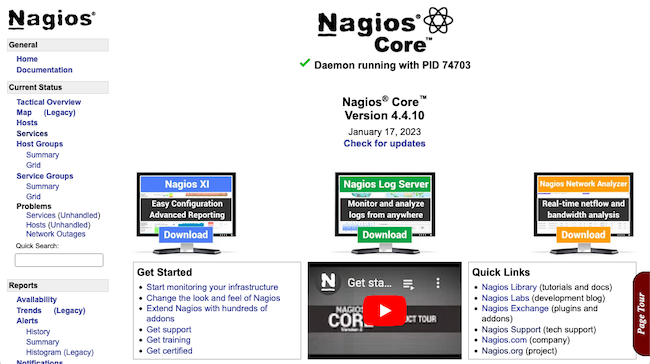
The browser should prompt for a login. Use the nagiosadmin username and the password configured with the htpasswd command above. Once logged in, you should arrive at the Nagios dashboard:
The interface provides access to a wide range of monitoring tasks. Get an overview of hosts monitored by your Nagios instance on the Hosts page:
At present, this only has one host, localhost. More hosts can be added, either by setting up Nagios to monitor publicly-available services or setting up NRPE.
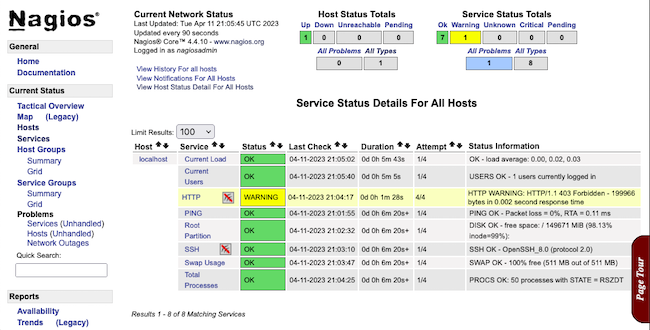
Another useful page to start out with is Services, which shows the services running for all hosts that Nagios is monitoring:
Conclusion
Now you have your own Nagios instance running. Exploring the dashboard’s myriad options can provide a good idea of Nagios’s capabilities. Take a look at the Nagios Core documentation linked below to continue exploring and make the most out of your instance.
More Information
You may wish to consult the following resources for additional information on this topic. While these are provided in the hope that they will be useful, please note that we cannot vouch for the accuracy or timeliness of externally hosted materials.
This page was originally published on


